> ## Documentation Index
> Fetch the complete documentation index at: https://docs.supernote.com/llms.txt
> Use this file to discover all available pages before exploring further.
# Your First Plugin
> Create, register buttons, package, and install a minimal Supernote plugin.
This chapter guides you through building a minimal runnable Supernote plugin:
* Register a toolbar button in NOTE/DOC
* Register a lasso toolbar button in NOTE/DOC
* Register a text-selection toolbar button in DOC
Clicking any of these buttons opens the same "Hello World" plugin UI. These three buttons represent three plugin entry points.
## Create a Plugin Project
A plugin project is essentially a React Native project. We recommend creating it via the community CLI with `npx` (usually no global `react-native-cli` is needed).
If you have previously installed an older global `react-native-cli` (or global `react-native`), uninstall them first to avoid scaffold version conflicts:
```bash wrap theme={null}
npm uninstall -g react-native-cli react-native
```
Create a project with:
```bash wrap theme={null}
npx @react-native-community/cli init project_name --template @supernote-plugin/sn-plugin-template --version 0.79.2
```
`project_name` is your project name. You can replace it with your own; keep the other arguments unchanged. Example:
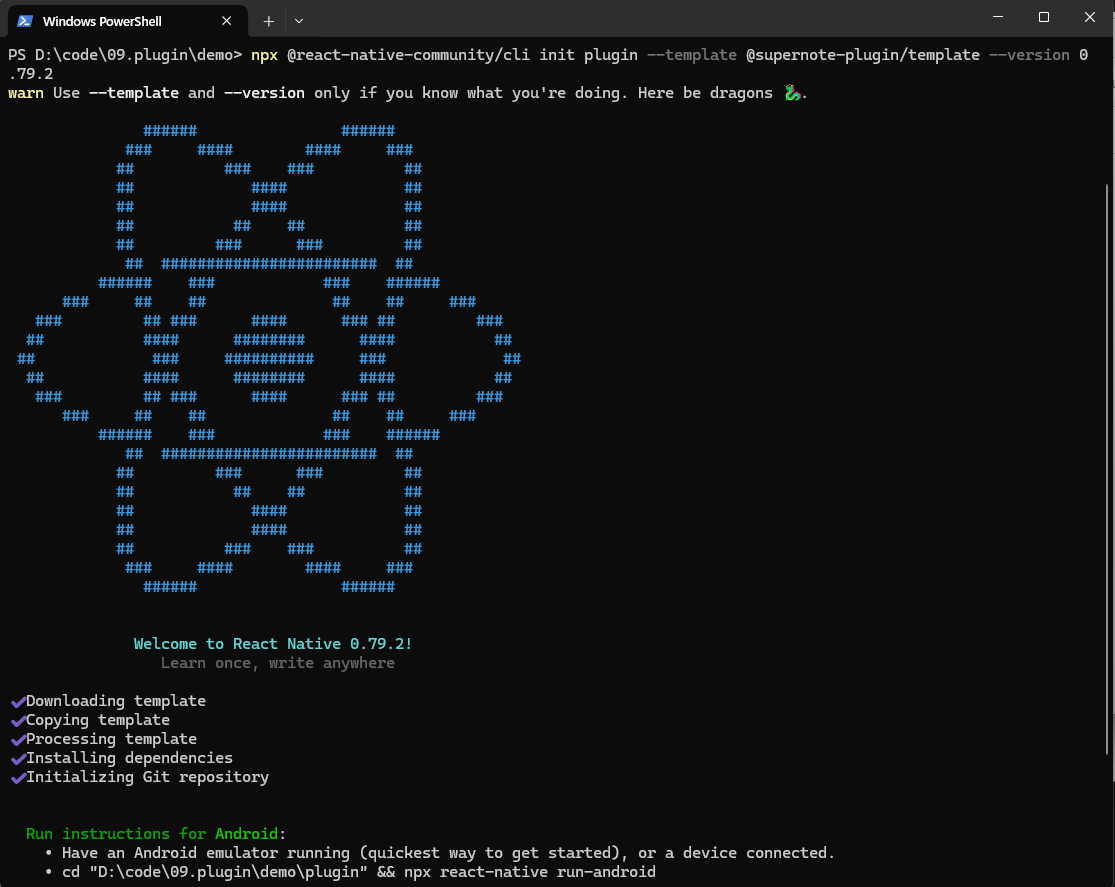 The plugin framework uses React Native `0.79.2`. Your plugin project must use the same version; otherwise it may fail to run or be incompatible with the host.
After a few minutes, a `plugin` folder will be created in the current directory. The structure looks like:
```text theme={null}
plugin\
|-- .bundle\\ # Bundle configuration directory
| \\-- config
|-- .eslintrc.js # ESLint configuration file
|-- .gitignore # Git ignore file configuration
|-- .prettierrc.js # Prettier code formatting configuration
|-- .watchmanconfig # Watchman configuration file
|-- *App.tsx # Main application component
|-- Gemfile # Ruby dependency management file
|-- README.md # Project documentation
|-- __tests__\\ # Test files directory
| \\-- App.test.tsx # App component test file
|-- *android\\ # Android platform related files
| |-- app\\ # Android application configuration
| | |-- build.gradle # App-level Gradle build file
| | |-- debug.keystore # Debug signing file
| | |-- proguard-rules.pro # ProGuard obfuscation rules
| | \\-- src\\ # Android source code directory
| | |-- debug\\ # Debug version configuration
| | | \\-- AndroidManifest.xml
| | \\-- main\\ # Main source code
| | |-- AndroidManifest.xml
| | |-- java\\ # Java/Kotlin source code
| | \\-- res\\ # Android resource files
| |-- build.gradle # Project-level Gradle build file
| |-- gradle\\ # Gradle Wrapper
| | \\-- wrapper\\
| | |-- gradle-wrapper.jar
| | \\-- gradle-wrapper.properties
| |-- gradle.properties # Gradle properties configuration
| |-- gradlew # Gradle Wrapper script (Unix)
| |-- gradlew.bat # Gradle Wrapper script (Windows)
| \\-- settings.gradle # Gradle settings file
|-- app.json # React Native application configuration
|-- babel.config.js # Babel transpiler configuration
|-- buildPlugin.ps1 # PowerShell build script
|-- buildPlugin.sh # Shell build script
|-- *index.js # Application entry point
|-- ios\\ # iOS platform related files
| |-- .xcode.env # Xcode environment configuration
| |-- Podfile # CocoaPods dependency management
| |-- plugin\\ # iOS application directory
| | |-- AppDelegate.swift # iOS application delegate
| | |-- Images.xcassets\\ # iOS image assets
| | | |-- AppIcon.appiconset\\ # Application icon set
| | | | \\-- Contents.json
| | | \\-- Contents.json
| | |-- Info.plist # iOS application info configuration
| | |-- LaunchScreen.storyboard # Launch screen
| | \\-- PrivacyInfo.xcprivacy # Privacy information configuration
| \\-- plugin.xcodeproj\\ # Xcode project file
| |-- project.pbxproj # Project configuration
| \\-- xcshareddata\\ # Shared data
| \\-- xcschemes\\ # Build schemes
| \\-- plugin.xcscheme
|-- jest.config.js # Jest testing framework configuration
|-- metro.config.js # Metro bundler configuration
|-- package-lock.json # npm dependency lock file
|-- *package.json # Project dependencies and scripts configuration
|-- *buildPlugin.ps1 # Plugin packaging script (Windows)
|-- *buildPlugin.sh # Plugin packaging script (Linux/macOS)
\\-- tsconfig.json # TypeScript configuration file
```
This is a standard React Native layout. The starred files/dirs are the ones you will use most often:
* `index.js`: plugin entry (initialization + button registration)
* `App.tsx`: plugin UI entry (React component)
* `package.json`: dependencies and scripts
* `android/`: Android native code (when you need native capabilities)
* `buildPlugin.ps1` / `buildPlugin.sh`: plugin packaging scripts
The template includes the plugin SDK (npm package: `sn-plugin-lib`). Import APIs in code via `import ... from 'sn-plugin-lib'`.
## Plugin Initialization
After creating the project, two key files are generated: `index.js` and `App.tsx`. They come from the template `@supernote-plugin/sn-plugin-template`.
`index.js` is the React Native entry and also the plugin entry. Plugin initialization must run here. You must call `PluginManager.init()` first; otherwise other plugin APIs will not work.
```ts wrap theme={null}
import { AppRegistry, Image } from 'react-native';
import App from './App';
import { name as appName } from './app.json';
import { PluginManager } from 'sn-plugin-lib';
AppRegistry.registerComponent(appName, () => App);
PluginManager.init();
```
In the snippet above, `PluginManager.init()` is called after `AppRegistry.registerComponent(...)` to complete initialization.
The rest is generated by the React Native template: `AppRegistry.registerComponent(...)` registers the UI entry component `App.tsx`.
## Button Registration
Plugins support three entry buttons:
1. **Toolbar button**: shown in NOTE/DOC toolbars
2. **Lasso toolbar button**: shown after the user creates a lasso selection
3. **Selection toolbar button**: DOC only; shown after selecting text in a DOC
Users can only enter the plugin from NOTE/DOC after you register these buttons.
### Register a Toolbar Button
Toolbar buttons must be registered in `index.js`, and must be called after `AppRegistry.registerComponent(...)` and `PluginManager.init()`:
```ts wrap theme={null}
import { AppRegistry, Image } from 'react-native';
import App from './App';
import { name as appName } from './app.json';
import { PluginManager } from 'sn-plugin-lib';
AppRegistry.registerComponent(appName, () => App);
PluginManager.init();
PluginManager.registerButton(1, ['NOTE', 'DOC'], {
id: 100,
name: 'Side Button',
icon: Image.resolveAssetSource(
require('./assets/icon/icon.png'),
).uri,
showType: 1,
});
```
`PluginManager.registerButton(type, appTypes, buttonConfig)` takes three arguments:
* `type`: button type. `1` toolbar, `2` lasso toolbar, `3` selection toolbar (DOC only)
* `appTypes`: supported app types array: `NOTE`, `DOC`
* `buttonConfig`: button properties:
```text theme={null}
{
id: unique button id; keep stable once defined
name: button label
icon: icon path (absolute path or uri)
showType: display mode. 0: do not show plugin UI; 1: show plugin UI (default 1)
}
```
When `showType=1`, tapping the button opens a full-screen container in PluginHost and renders the plugin UI.
When `showType=0`, no UI is shown; the plugin still receives the button event and can run background logic.
After packaging and installation, NOTE/DOC will show a plugin entry button in the toolbar:
The plugin framework uses React Native `0.79.2`. Your plugin project must use the same version; otherwise it may fail to run or be incompatible with the host.
After a few minutes, a `plugin` folder will be created in the current directory. The structure looks like:
```text theme={null}
plugin\
|-- .bundle\\ # Bundle configuration directory
| \\-- config
|-- .eslintrc.js # ESLint configuration file
|-- .gitignore # Git ignore file configuration
|-- .prettierrc.js # Prettier code formatting configuration
|-- .watchmanconfig # Watchman configuration file
|-- *App.tsx # Main application component
|-- Gemfile # Ruby dependency management file
|-- README.md # Project documentation
|-- __tests__\\ # Test files directory
| \\-- App.test.tsx # App component test file
|-- *android\\ # Android platform related files
| |-- app\\ # Android application configuration
| | |-- build.gradle # App-level Gradle build file
| | |-- debug.keystore # Debug signing file
| | |-- proguard-rules.pro # ProGuard obfuscation rules
| | \\-- src\\ # Android source code directory
| | |-- debug\\ # Debug version configuration
| | | \\-- AndroidManifest.xml
| | \\-- main\\ # Main source code
| | |-- AndroidManifest.xml
| | |-- java\\ # Java/Kotlin source code
| | \\-- res\\ # Android resource files
| |-- build.gradle # Project-level Gradle build file
| |-- gradle\\ # Gradle Wrapper
| | \\-- wrapper\\
| | |-- gradle-wrapper.jar
| | \\-- gradle-wrapper.properties
| |-- gradle.properties # Gradle properties configuration
| |-- gradlew # Gradle Wrapper script (Unix)
| |-- gradlew.bat # Gradle Wrapper script (Windows)
| \\-- settings.gradle # Gradle settings file
|-- app.json # React Native application configuration
|-- babel.config.js # Babel transpiler configuration
|-- buildPlugin.ps1 # PowerShell build script
|-- buildPlugin.sh # Shell build script
|-- *index.js # Application entry point
|-- ios\\ # iOS platform related files
| |-- .xcode.env # Xcode environment configuration
| |-- Podfile # CocoaPods dependency management
| |-- plugin\\ # iOS application directory
| | |-- AppDelegate.swift # iOS application delegate
| | |-- Images.xcassets\\ # iOS image assets
| | | |-- AppIcon.appiconset\\ # Application icon set
| | | | \\-- Contents.json
| | | \\-- Contents.json
| | |-- Info.plist # iOS application info configuration
| | |-- LaunchScreen.storyboard # Launch screen
| | \\-- PrivacyInfo.xcprivacy # Privacy information configuration
| \\-- plugin.xcodeproj\\ # Xcode project file
| |-- project.pbxproj # Project configuration
| \\-- xcshareddata\\ # Shared data
| \\-- xcschemes\\ # Build schemes
| \\-- plugin.xcscheme
|-- jest.config.js # Jest testing framework configuration
|-- metro.config.js # Metro bundler configuration
|-- package-lock.json # npm dependency lock file
|-- *package.json # Project dependencies and scripts configuration
|-- *buildPlugin.ps1 # Plugin packaging script (Windows)
|-- *buildPlugin.sh # Plugin packaging script (Linux/macOS)
\\-- tsconfig.json # TypeScript configuration file
```
This is a standard React Native layout. The starred files/dirs are the ones you will use most often:
* `index.js`: plugin entry (initialization + button registration)
* `App.tsx`: plugin UI entry (React component)
* `package.json`: dependencies and scripts
* `android/`: Android native code (when you need native capabilities)
* `buildPlugin.ps1` / `buildPlugin.sh`: plugin packaging scripts
The template includes the plugin SDK (npm package: `sn-plugin-lib`). Import APIs in code via `import ... from 'sn-plugin-lib'`.
## Plugin Initialization
After creating the project, two key files are generated: `index.js` and `App.tsx`. They come from the template `@supernote-plugin/sn-plugin-template`.
`index.js` is the React Native entry and also the plugin entry. Plugin initialization must run here. You must call `PluginManager.init()` first; otherwise other plugin APIs will not work.
```ts wrap theme={null}
import { AppRegistry, Image } from 'react-native';
import App from './App';
import { name as appName } from './app.json';
import { PluginManager } from 'sn-plugin-lib';
AppRegistry.registerComponent(appName, () => App);
PluginManager.init();
```
In the snippet above, `PluginManager.init()` is called after `AppRegistry.registerComponent(...)` to complete initialization.
The rest is generated by the React Native template: `AppRegistry.registerComponent(...)` registers the UI entry component `App.tsx`.
## Button Registration
Plugins support three entry buttons:
1. **Toolbar button**: shown in NOTE/DOC toolbars
2. **Lasso toolbar button**: shown after the user creates a lasso selection
3. **Selection toolbar button**: DOC only; shown after selecting text in a DOC
Users can only enter the plugin from NOTE/DOC after you register these buttons.
### Register a Toolbar Button
Toolbar buttons must be registered in `index.js`, and must be called after `AppRegistry.registerComponent(...)` and `PluginManager.init()`:
```ts wrap theme={null}
import { AppRegistry, Image } from 'react-native';
import App from './App';
import { name as appName } from './app.json';
import { PluginManager } from 'sn-plugin-lib';
AppRegistry.registerComponent(appName, () => App);
PluginManager.init();
PluginManager.registerButton(1, ['NOTE', 'DOC'], {
id: 100,
name: 'Side Button',
icon: Image.resolveAssetSource(
require('./assets/icon/icon.png'),
).uri,
showType: 1,
});
```
`PluginManager.registerButton(type, appTypes, buttonConfig)` takes three arguments:
* `type`: button type. `1` toolbar, `2` lasso toolbar, `3` selection toolbar (DOC only)
* `appTypes`: supported app types array: `NOTE`, `DOC`
* `buttonConfig`: button properties:
```text theme={null}
{
id: unique button id; keep stable once defined
name: button label
icon: icon path (absolute path or uri)
showType: display mode. 0: do not show plugin UI; 1: show plugin UI (default 1)
}
```
When `showType=1`, tapping the button opens a full-screen container in PluginHost and renders the plugin UI.
When `showType=0`, no UI is shown; the plugin still receives the button event and can run background logic.
After packaging and installation, NOTE/DOC will show a plugin entry button in the toolbar:
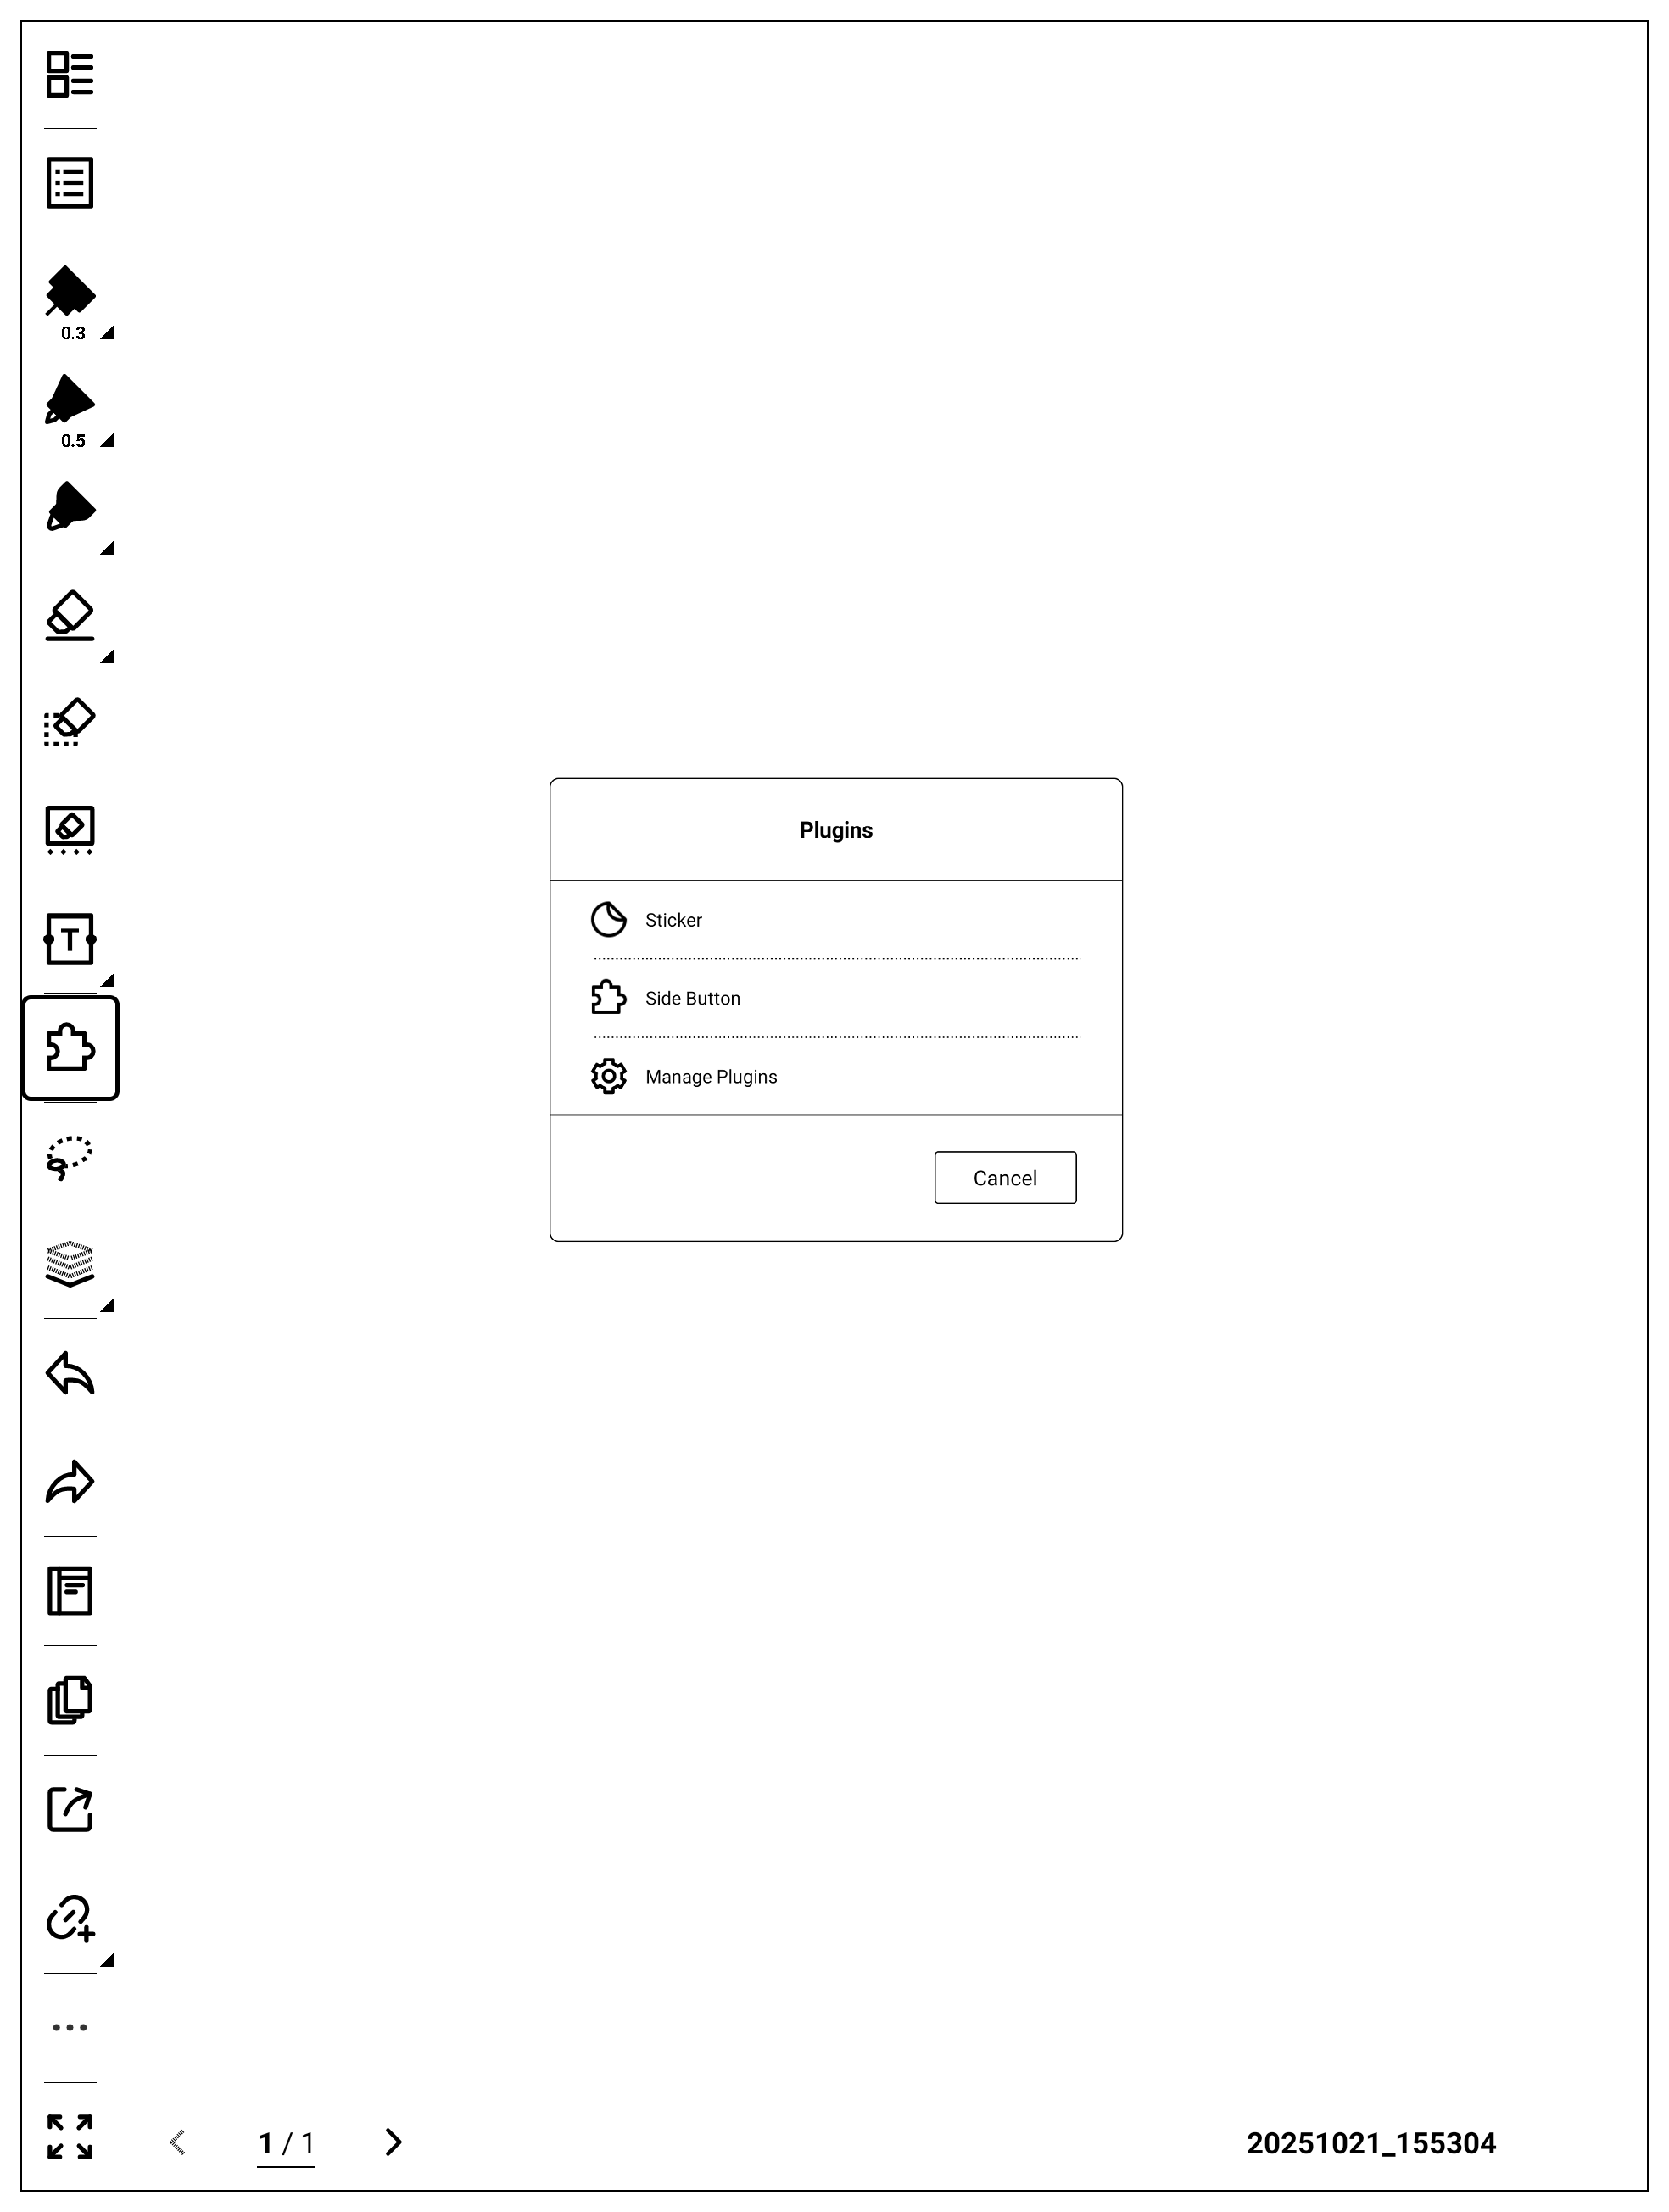 The example registers a button named "Side Button".
### Register a Lasso Toolbar Button
Lasso toolbar buttons are also registered via `PluginManager.registerButton`:
```ts wrap theme={null}
import { AppRegistry, Image } from 'react-native';
import App from './App';
import { name as appName } from './app.json';
import { PluginManager } from 'sn-plugin-lib';
AppRegistry.registerComponent(appName, () => App);
PluginManager.init();
PluginManager.registerButton(1, ['NOTE', 'DOC'], {
id: 100,
name: 'Side Button',
icon: Image.resolveAssetSource(
require('./assets/icon/icon.png'),
).uri,
});
PluginManager.registerButton(2, ['NOTE', 'DOC'], {
id: 200,
name: 'Lasso Button',
icon: Image.resolveAssetSource(
require('./assets/icon/icon.png'),
).uri,
editDataTypes: [0, 1, 2, 3, 4, 5],
showType: 1,
});
```
Set the first argument to `type=2` to register a lasso toolbar button.
Compared to toolbar buttons, lasso buttons add `editDataTypes`:
```text theme={null}
{
id: unique button id; keep stable once defined
name: button label
icon: icon path (absolute path or uri)
editDataTypes: lasso data type array; the button is shown only when selection matches
0: handwritten strokes
1: title
2: image
3: text
4: link
5: geometric shapes
showType: display mode. 0: do not show plugin UI; 1: show plugin UI (default 1)
}
```
Compared to toolbar buttons, lasso buttons use `editDataTypes` to control when the button should appear.
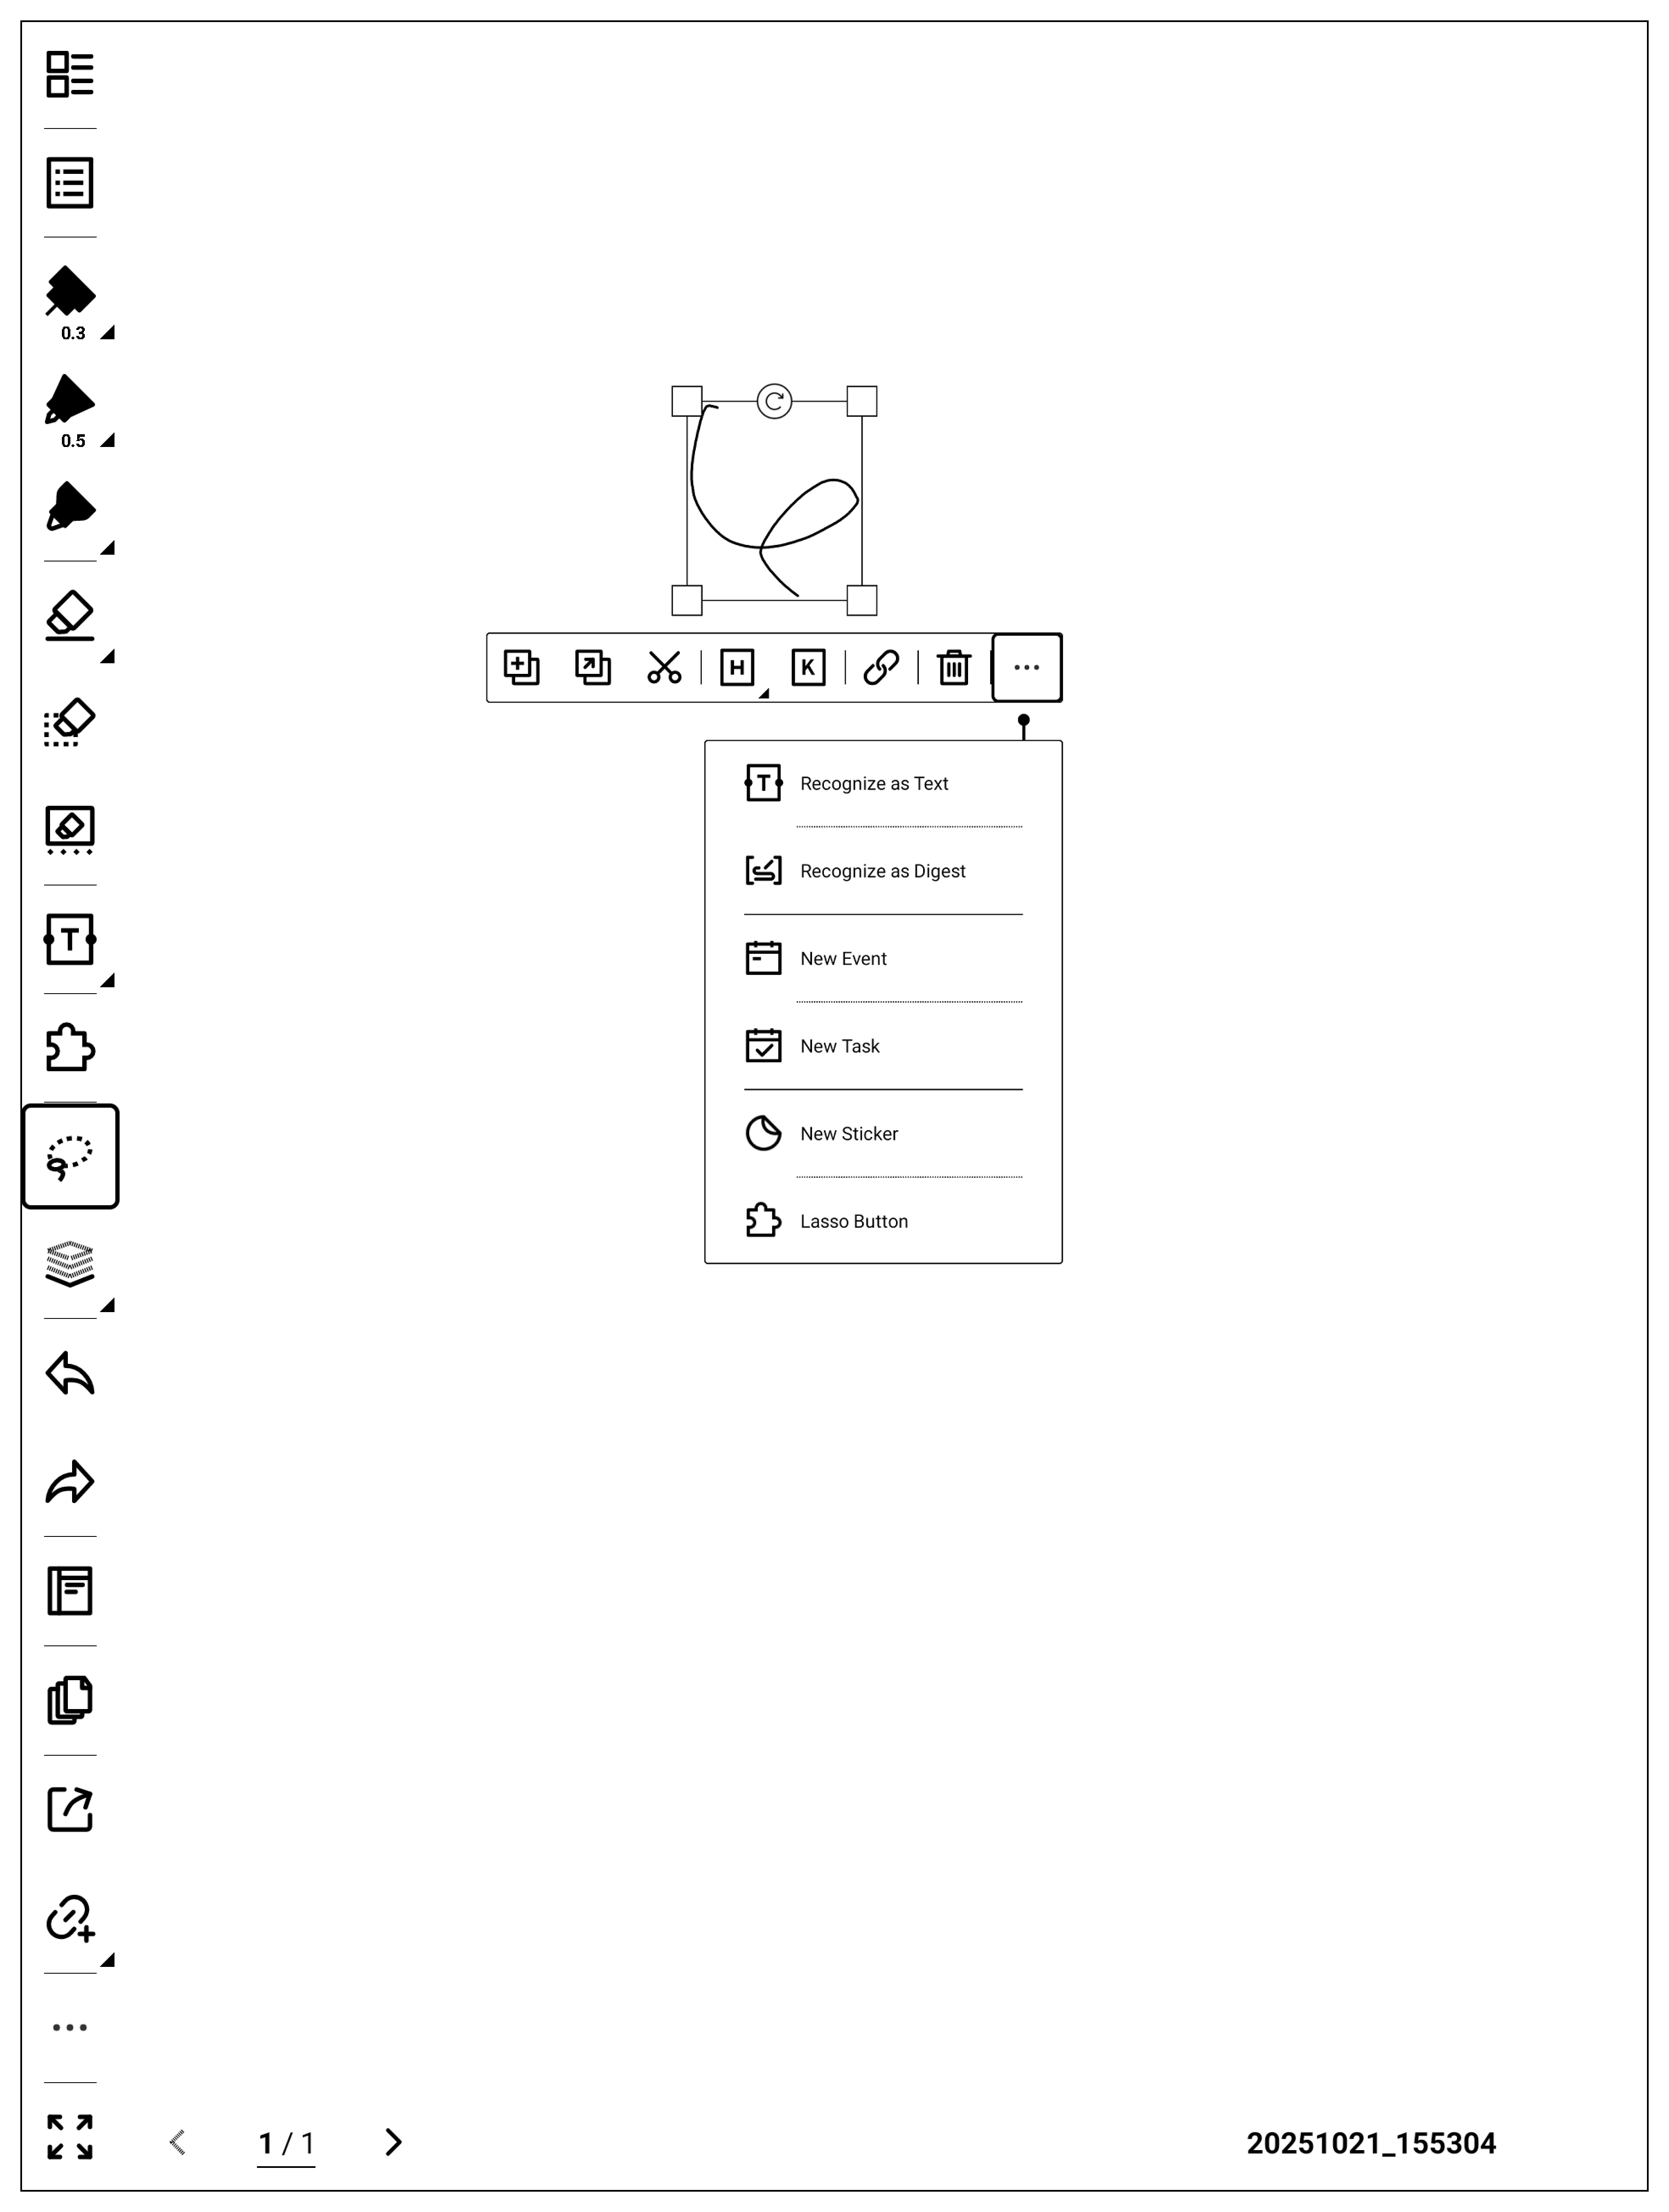
After packaging and installation, "Lasso Button" will appear when lasso selection is active:
The example registers a button named "Side Button".
### Register a Lasso Toolbar Button
Lasso toolbar buttons are also registered via `PluginManager.registerButton`:
```ts wrap theme={null}
import { AppRegistry, Image } from 'react-native';
import App from './App';
import { name as appName } from './app.json';
import { PluginManager } from 'sn-plugin-lib';
AppRegistry.registerComponent(appName, () => App);
PluginManager.init();
PluginManager.registerButton(1, ['NOTE', 'DOC'], {
id: 100,
name: 'Side Button',
icon: Image.resolveAssetSource(
require('./assets/icon/icon.png'),
).uri,
});
PluginManager.registerButton(2, ['NOTE', 'DOC'], {
id: 200,
name: 'Lasso Button',
icon: Image.resolveAssetSource(
require('./assets/icon/icon.png'),
).uri,
editDataTypes: [0, 1, 2, 3, 4, 5],
showType: 1,
});
```
Set the first argument to `type=2` to register a lasso toolbar button.
Compared to toolbar buttons, lasso buttons add `editDataTypes`:
```text theme={null}
{
id: unique button id; keep stable once defined
name: button label
icon: icon path (absolute path or uri)
editDataTypes: lasso data type array; the button is shown only when selection matches
0: handwritten strokes
1: title
2: image
3: text
4: link
5: geometric shapes
showType: display mode. 0: do not show plugin UI; 1: show plugin UI (default 1)
}
```
Compared to toolbar buttons, lasso buttons use `editDataTypes` to control when the button should appear.
After packaging and installation, "Lasso Button" will appear when lasso selection is active:
 ### Register a Selection Toolbar Button
Selection toolbar buttons are DOC-only, and are also registered via `PluginManager.registerButton`:
```ts wrap theme={null}
import { AppRegistry, Image } from 'react-native';
import App from './App';
import { name as appName } from './app.json';
import { PluginManager } from 'sn-plugin-lib';
AppRegistry.registerComponent(appName, () => App);
PluginManager.init();
PluginManager.registerButton(1, ['NOTE', 'DOC'], {
id: 100,
name: 'Side Button',
icon: Image.resolveAssetSource(
require('./assets/icon/icon.png'),
).uri,
});
PluginManager.registerButton(2, ['NOTE', 'DOC'], {
id: 200,
name: 'Lasso Button',
icon: Image.resolveAssetSource(
require('./assets/icon/icon.png'),
).uri,
editDataTypes: [0, 1, 2, 3, 4, 5],
showType: 1,
});
PluginManager.registerButton(3, ['NOTE', 'DOC'], {
id: 300,
name: 'Selection Button',
icon: Image.resolveAssetSource(
require('./assets/icon/icon.png'),
).uri,
showType: 1,
});
```
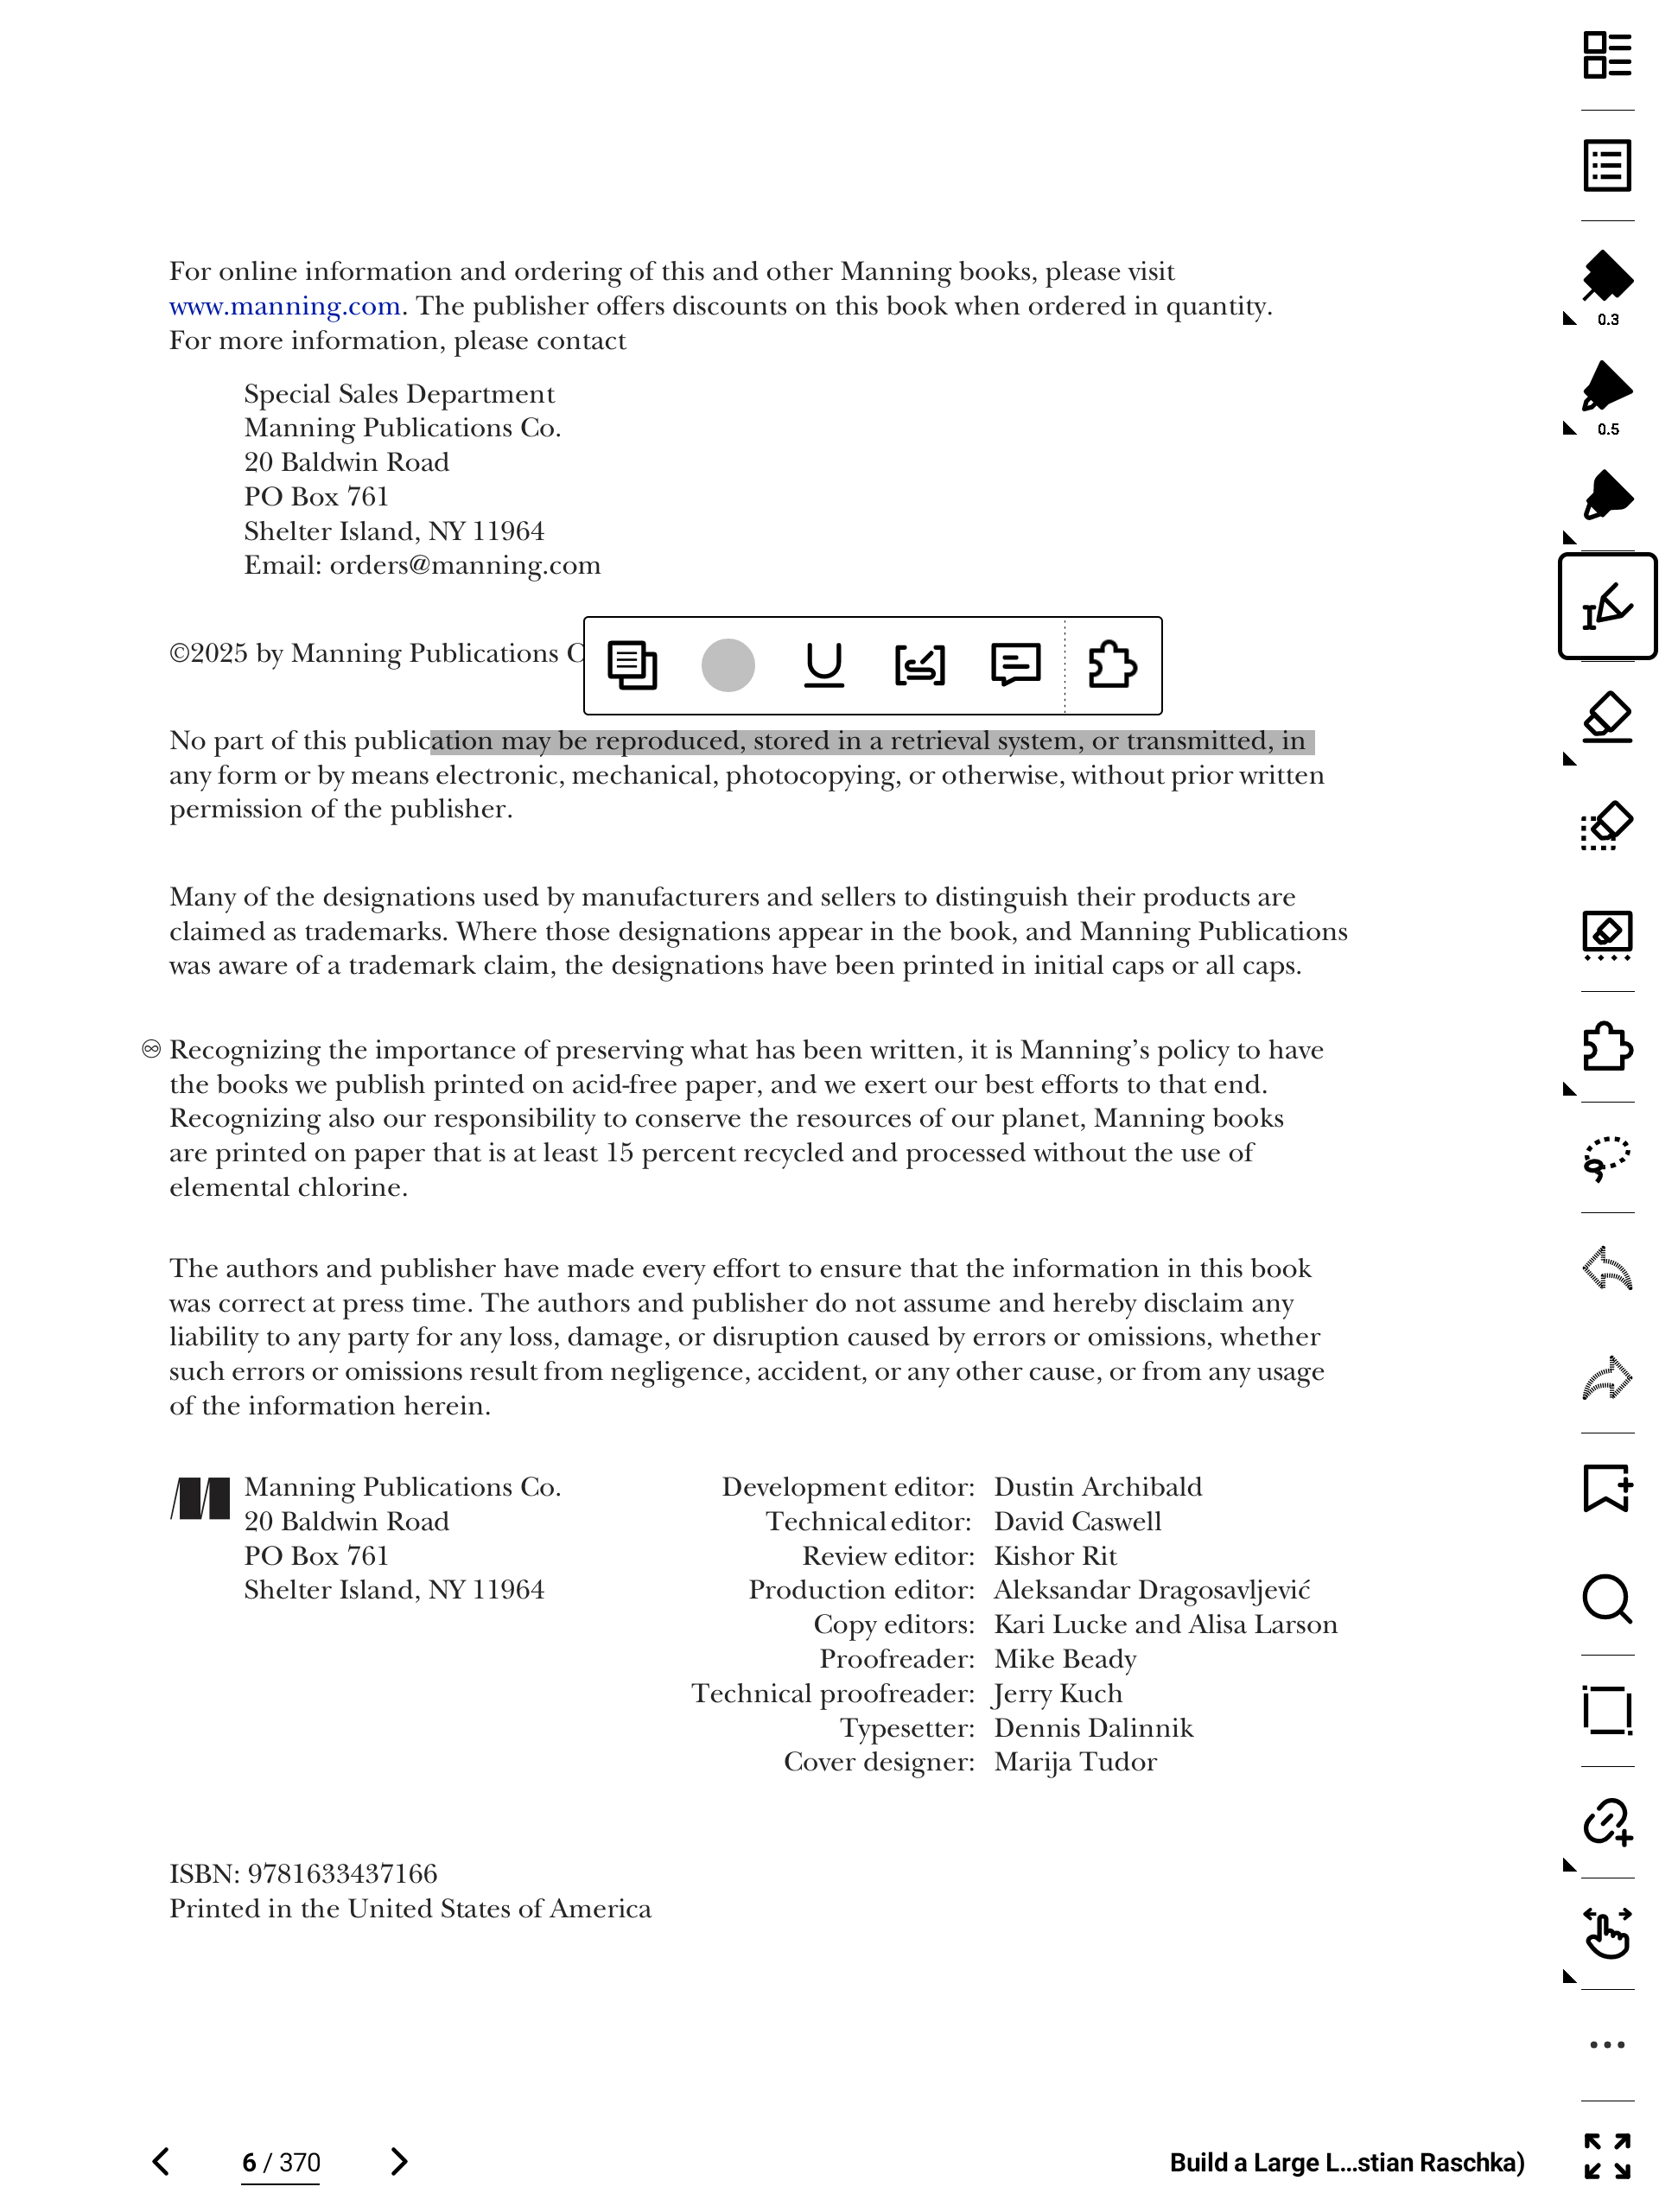
Set the first argument to `type=3` to show the button in DOC’s selection toolbar:
### Register a Selection Toolbar Button
Selection toolbar buttons are DOC-only, and are also registered via `PluginManager.registerButton`:
```ts wrap theme={null}
import { AppRegistry, Image } from 'react-native';
import App from './App';
import { name as appName } from './app.json';
import { PluginManager } from 'sn-plugin-lib';
AppRegistry.registerComponent(appName, () => App);
PluginManager.init();
PluginManager.registerButton(1, ['NOTE', 'DOC'], {
id: 100,
name: 'Side Button',
icon: Image.resolveAssetSource(
require('./assets/icon/icon.png'),
).uri,
});
PluginManager.registerButton(2, ['NOTE', 'DOC'], {
id: 200,
name: 'Lasso Button',
icon: Image.resolveAssetSource(
require('./assets/icon/icon.png'),
).uri,
editDataTypes: [0, 1, 2, 3, 4, 5],
showType: 1,
});
PluginManager.registerButton(3, ['NOTE', 'DOC'], {
id: 300,
name: 'Selection Button',
icon: Image.resolveAssetSource(
require('./assets/icon/icon.png'),
).uri,
showType: 1,
});
```
Set the first argument to `type=3` to show the button in DOC’s selection toolbar:
 ## Implement the Plugin UI
`App.tsx` is the UI entry component. The template provides a simple "Hello World" UI you can modify:
```ts wrap theme={null}
import React from 'react';
import {
StatusBar,
StyleSheet,
Text,
useColorScheme,
View,
} from 'react-native';
function App(): React.JSX.Element {
const isDarkMode = useColorScheme() === 'dark';
return (
Hello World
);
}
const styles = StyleSheet.create({
container: {
flex: 1,
justifyContent: 'center',
alignItems: 'center',
backgroundColor: '#ffffff',
},
helloText: {
fontSize: 24,
fontWeight: '600',
textAlign: 'center',
},
});
export default App;
```
This code is generated by the template. You can modify the UI by editing `App.tsx`.
The default `App.tsx` shows "Hello World" centered on a white background:
## Implement the Plugin UI
`App.tsx` is the UI entry component. The template provides a simple "Hello World" UI you can modify:
```ts wrap theme={null}
import React from 'react';
import {
StatusBar,
StyleSheet,
Text,
useColorScheme,
View,
} from 'react-native';
function App(): React.JSX.Element {
const isDarkMode = useColorScheme() === 'dark';
return (
Hello World
);
}
const styles = StyleSheet.create({
container: {
flex: 1,
justifyContent: 'center',
alignItems: 'center',
backgroundColor: '#ffffff',
},
helloText: {
fontSize: 24,
fontWeight: '600',
textAlign: 'center',
},
});
export default App;
```
This code is generated by the template. You can modify the UI by editing `App.tsx`.
The default `App.tsx` shows "Hello World" centered on a white background:
 Tap "Side Button / Lasso Button / Selection Button" to open the UI.
## Package the Plugin
This section describes how to build a plugin package.
The template includes two packaging scripts: `buildPlugin.ps1` (Windows) and `buildPlugin.sh` (Linux/macOS). Run the script from the project root.
On Windows:
```bash wrap theme={null}
.\buildPlugin.ps1
```
On Linux/macOS:
```bash wrap theme={null}
./buildPlugin.sh
```
On the first run, a `PluginConfig.json` is generated in the project root:
```json wrap theme={null}
{
"name": "plugin",
"pluginKey": "plugin",
"pluginID": "98blcl1mp5fxamrm",
"iconPath": "",
"desc": "",
"versionCode": "1",
"versionName": "0.0.1",
"jsMainPath": "index"
}
```
`PluginConfig.json` is the plugin configuration file. It is generated only on the first packaging run; you should maintain it afterwards.
| Field | Description |
| ------------- | ----------------------------------------------------------------------------------------------------------------------------------- |
| `name` | Plugin name. Editable. |
| `pluginKey` | Must match the first argument of `AppRegistry.registerComponent(...)`, otherwise the plugin won’t run. |
| `pluginID` | Unique plugin id generated by the packaging script. Do not change it after generation, or it will be treated as a different plugin. |
| `iconPath` | Plugin icon path (relative to project root). Fill it manually. |
| `versionCode` | Plugin version code. |
| `versionName` | Plugin version name. |
| `desc` | Plugin description. |
| `jsMainPath` | JS entry filename (without extension). Example: `index`. Keep it unchanged. |
| `author` | Optional. Add manually; packaging does not generate it. |
After packaging, a `build` directory is created:
```text theme={null}
build\
|-- generated\\
| |-- PluginConfig.json
| |-- drawable-mdpi\\
| | \\-- assets_icon_icon.png
| \\-- plugin.bundle
\\-- outputs\\
\\-- plugin.snplg
```
`generated` contains intermediate artifacts. The final plugin package is `build\\outputs\\plugin.snplg`.
## Install the Plugin
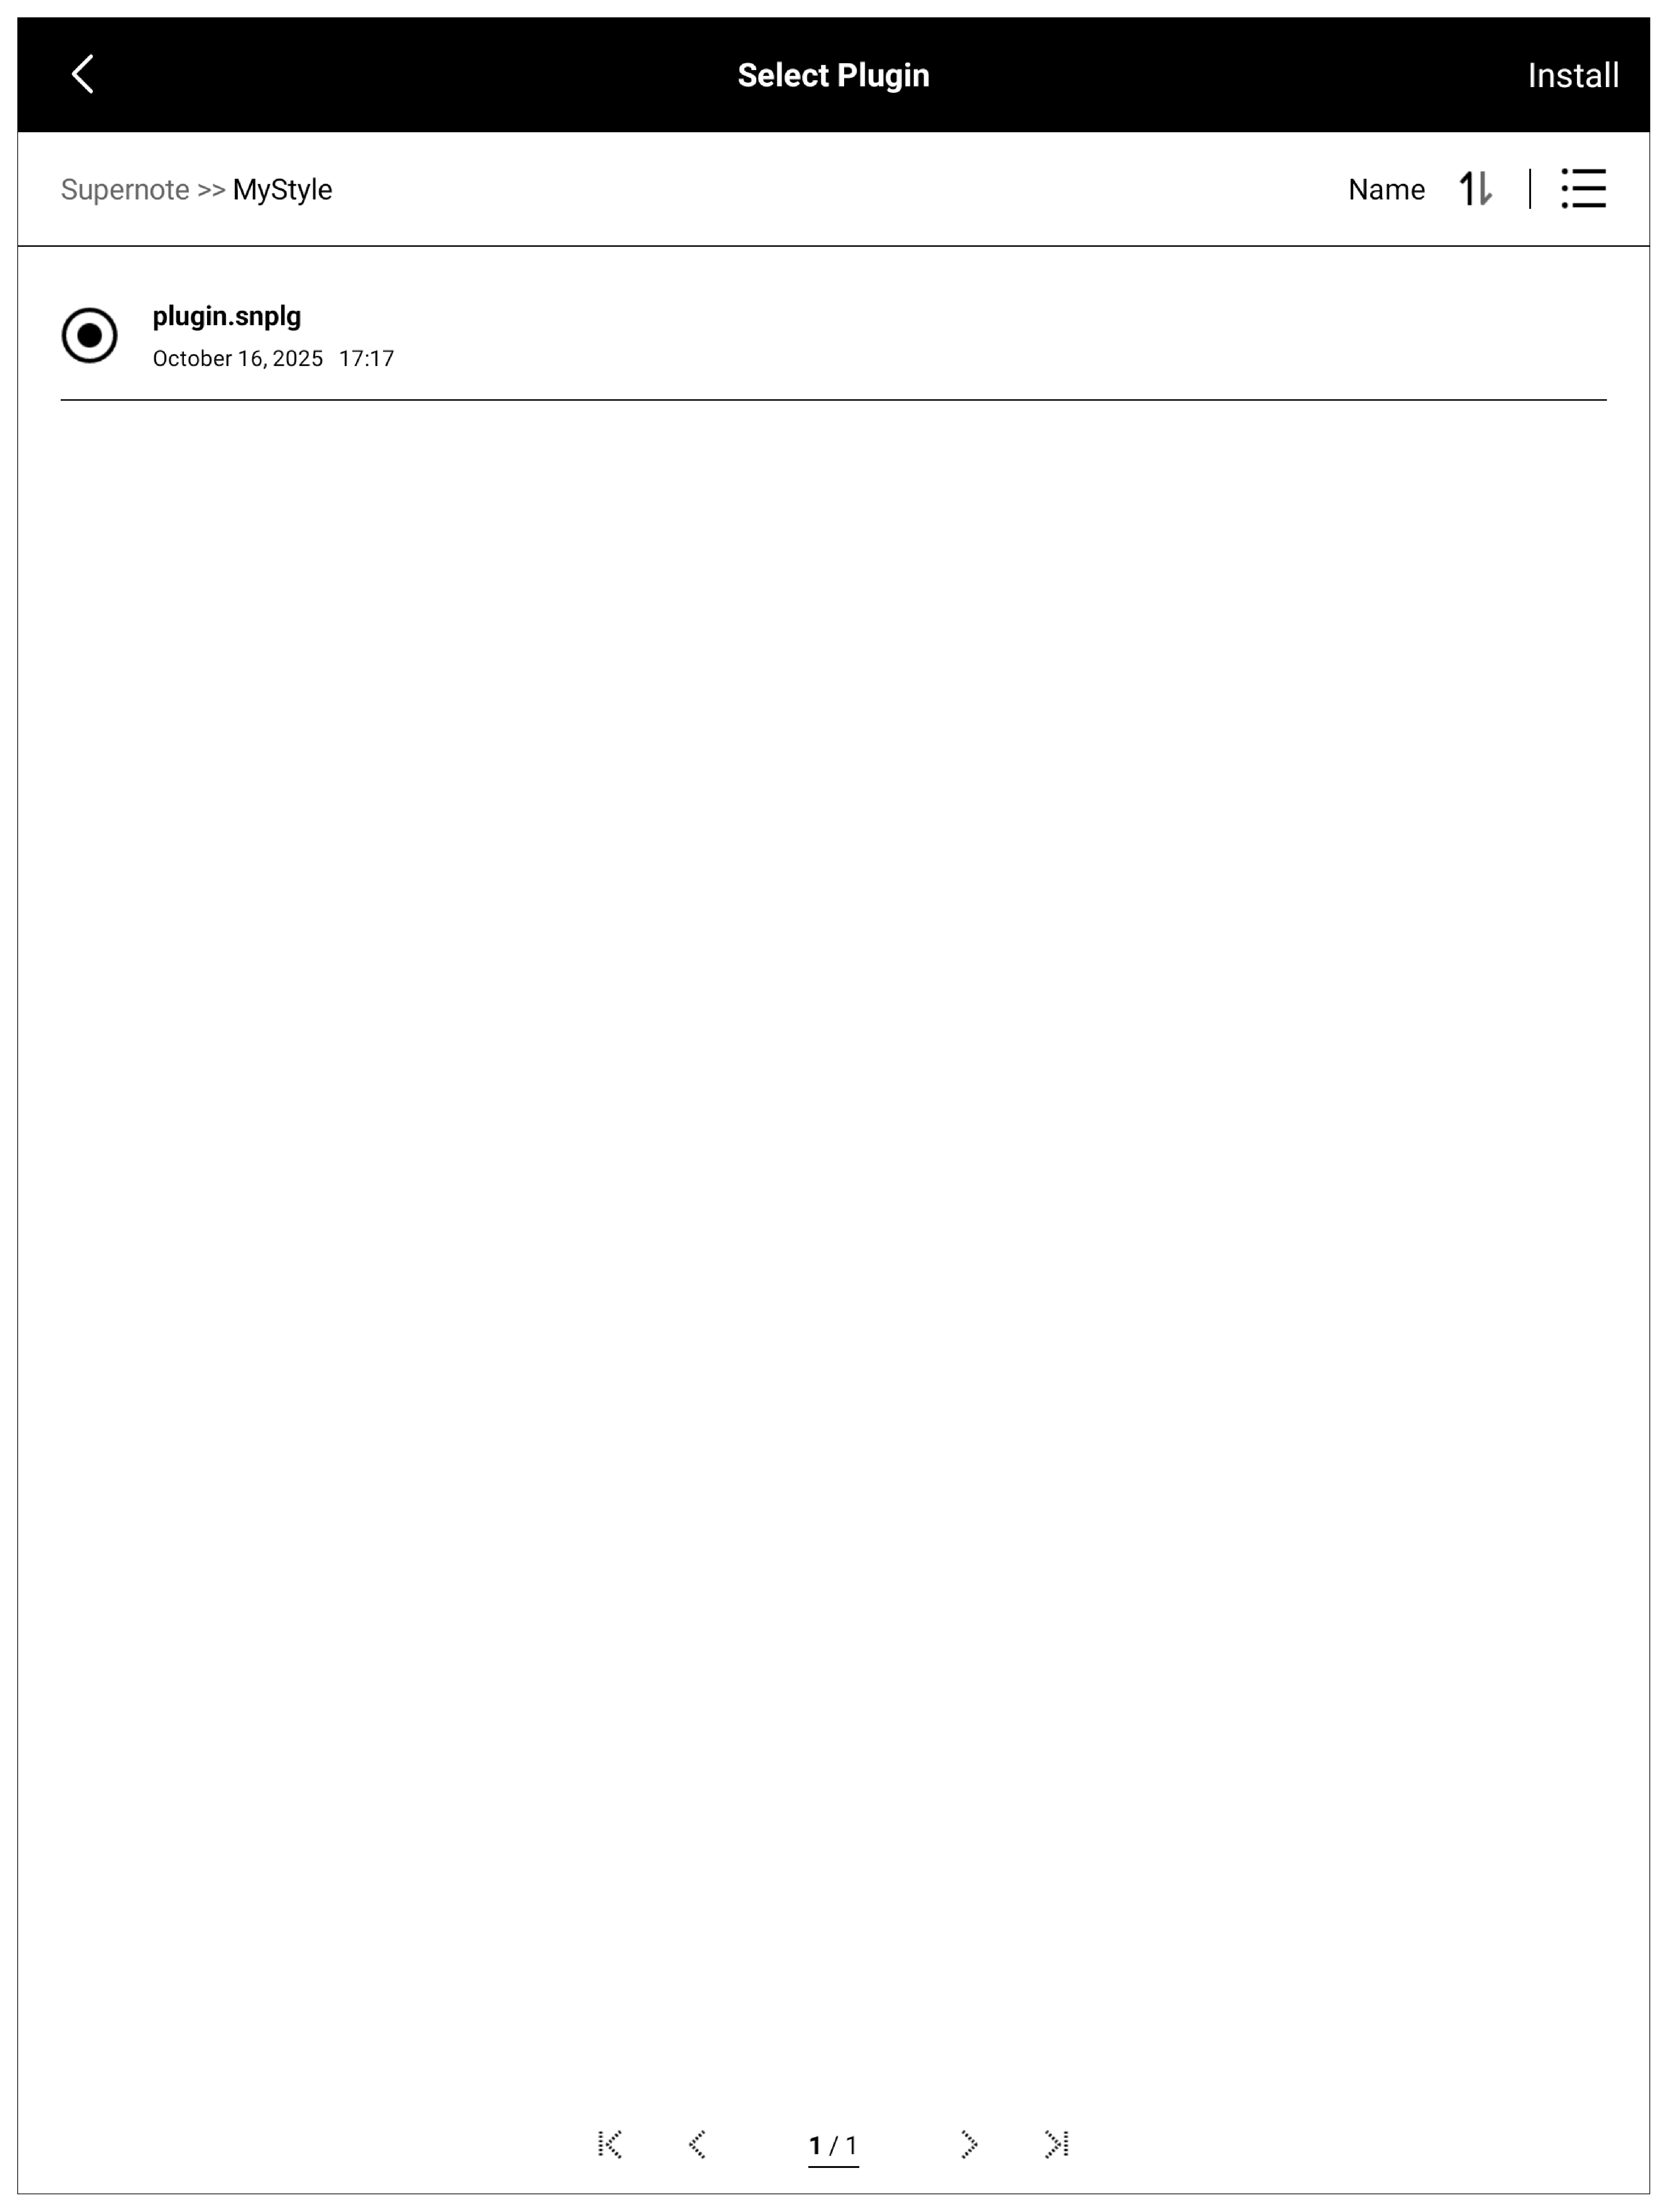
Copy `build\\outputs\\plugin.snplg` to the `MyStyle` directory on your SuperNOTE device.
Then open "Settings -> Apps -> Plugins":
Tap "Side Button / Lasso Button / Selection Button" to open the UI.
## Package the Plugin
This section describes how to build a plugin package.
The template includes two packaging scripts: `buildPlugin.ps1` (Windows) and `buildPlugin.sh` (Linux/macOS). Run the script from the project root.
On Windows:
```bash wrap theme={null}
.\buildPlugin.ps1
```
On Linux/macOS:
```bash wrap theme={null}
./buildPlugin.sh
```
On the first run, a `PluginConfig.json` is generated in the project root:
```json wrap theme={null}
{
"name": "plugin",
"pluginKey": "plugin",
"pluginID": "98blcl1mp5fxamrm",
"iconPath": "",
"desc": "",
"versionCode": "1",
"versionName": "0.0.1",
"jsMainPath": "index"
}
```
`PluginConfig.json` is the plugin configuration file. It is generated only on the first packaging run; you should maintain it afterwards.
| Field | Description |
| ------------- | ----------------------------------------------------------------------------------------------------------------------------------- |
| `name` | Plugin name. Editable. |
| `pluginKey` | Must match the first argument of `AppRegistry.registerComponent(...)`, otherwise the plugin won’t run. |
| `pluginID` | Unique plugin id generated by the packaging script. Do not change it after generation, or it will be treated as a different plugin. |
| `iconPath` | Plugin icon path (relative to project root). Fill it manually. |
| `versionCode` | Plugin version code. |
| `versionName` | Plugin version name. |
| `desc` | Plugin description. |
| `jsMainPath` | JS entry filename (without extension). Example: `index`. Keep it unchanged. |
| `author` | Optional. Add manually; packaging does not generate it. |
After packaging, a `build` directory is created:
```text theme={null}
build\
|-- generated\\
| |-- PluginConfig.json
| |-- drawable-mdpi\\
| | \\-- assets_icon_icon.png
| \\-- plugin.bundle
\\-- outputs\\
\\-- plugin.snplg
```
`generated` contains intermediate artifacts. The final plugin package is `build\\outputs\\plugin.snplg`.
## Install the Plugin
Copy `build\\outputs\\plugin.snplg` to the `MyStyle` directory on your SuperNOTE device.
Then open "Settings -> Apps -> Plugins":
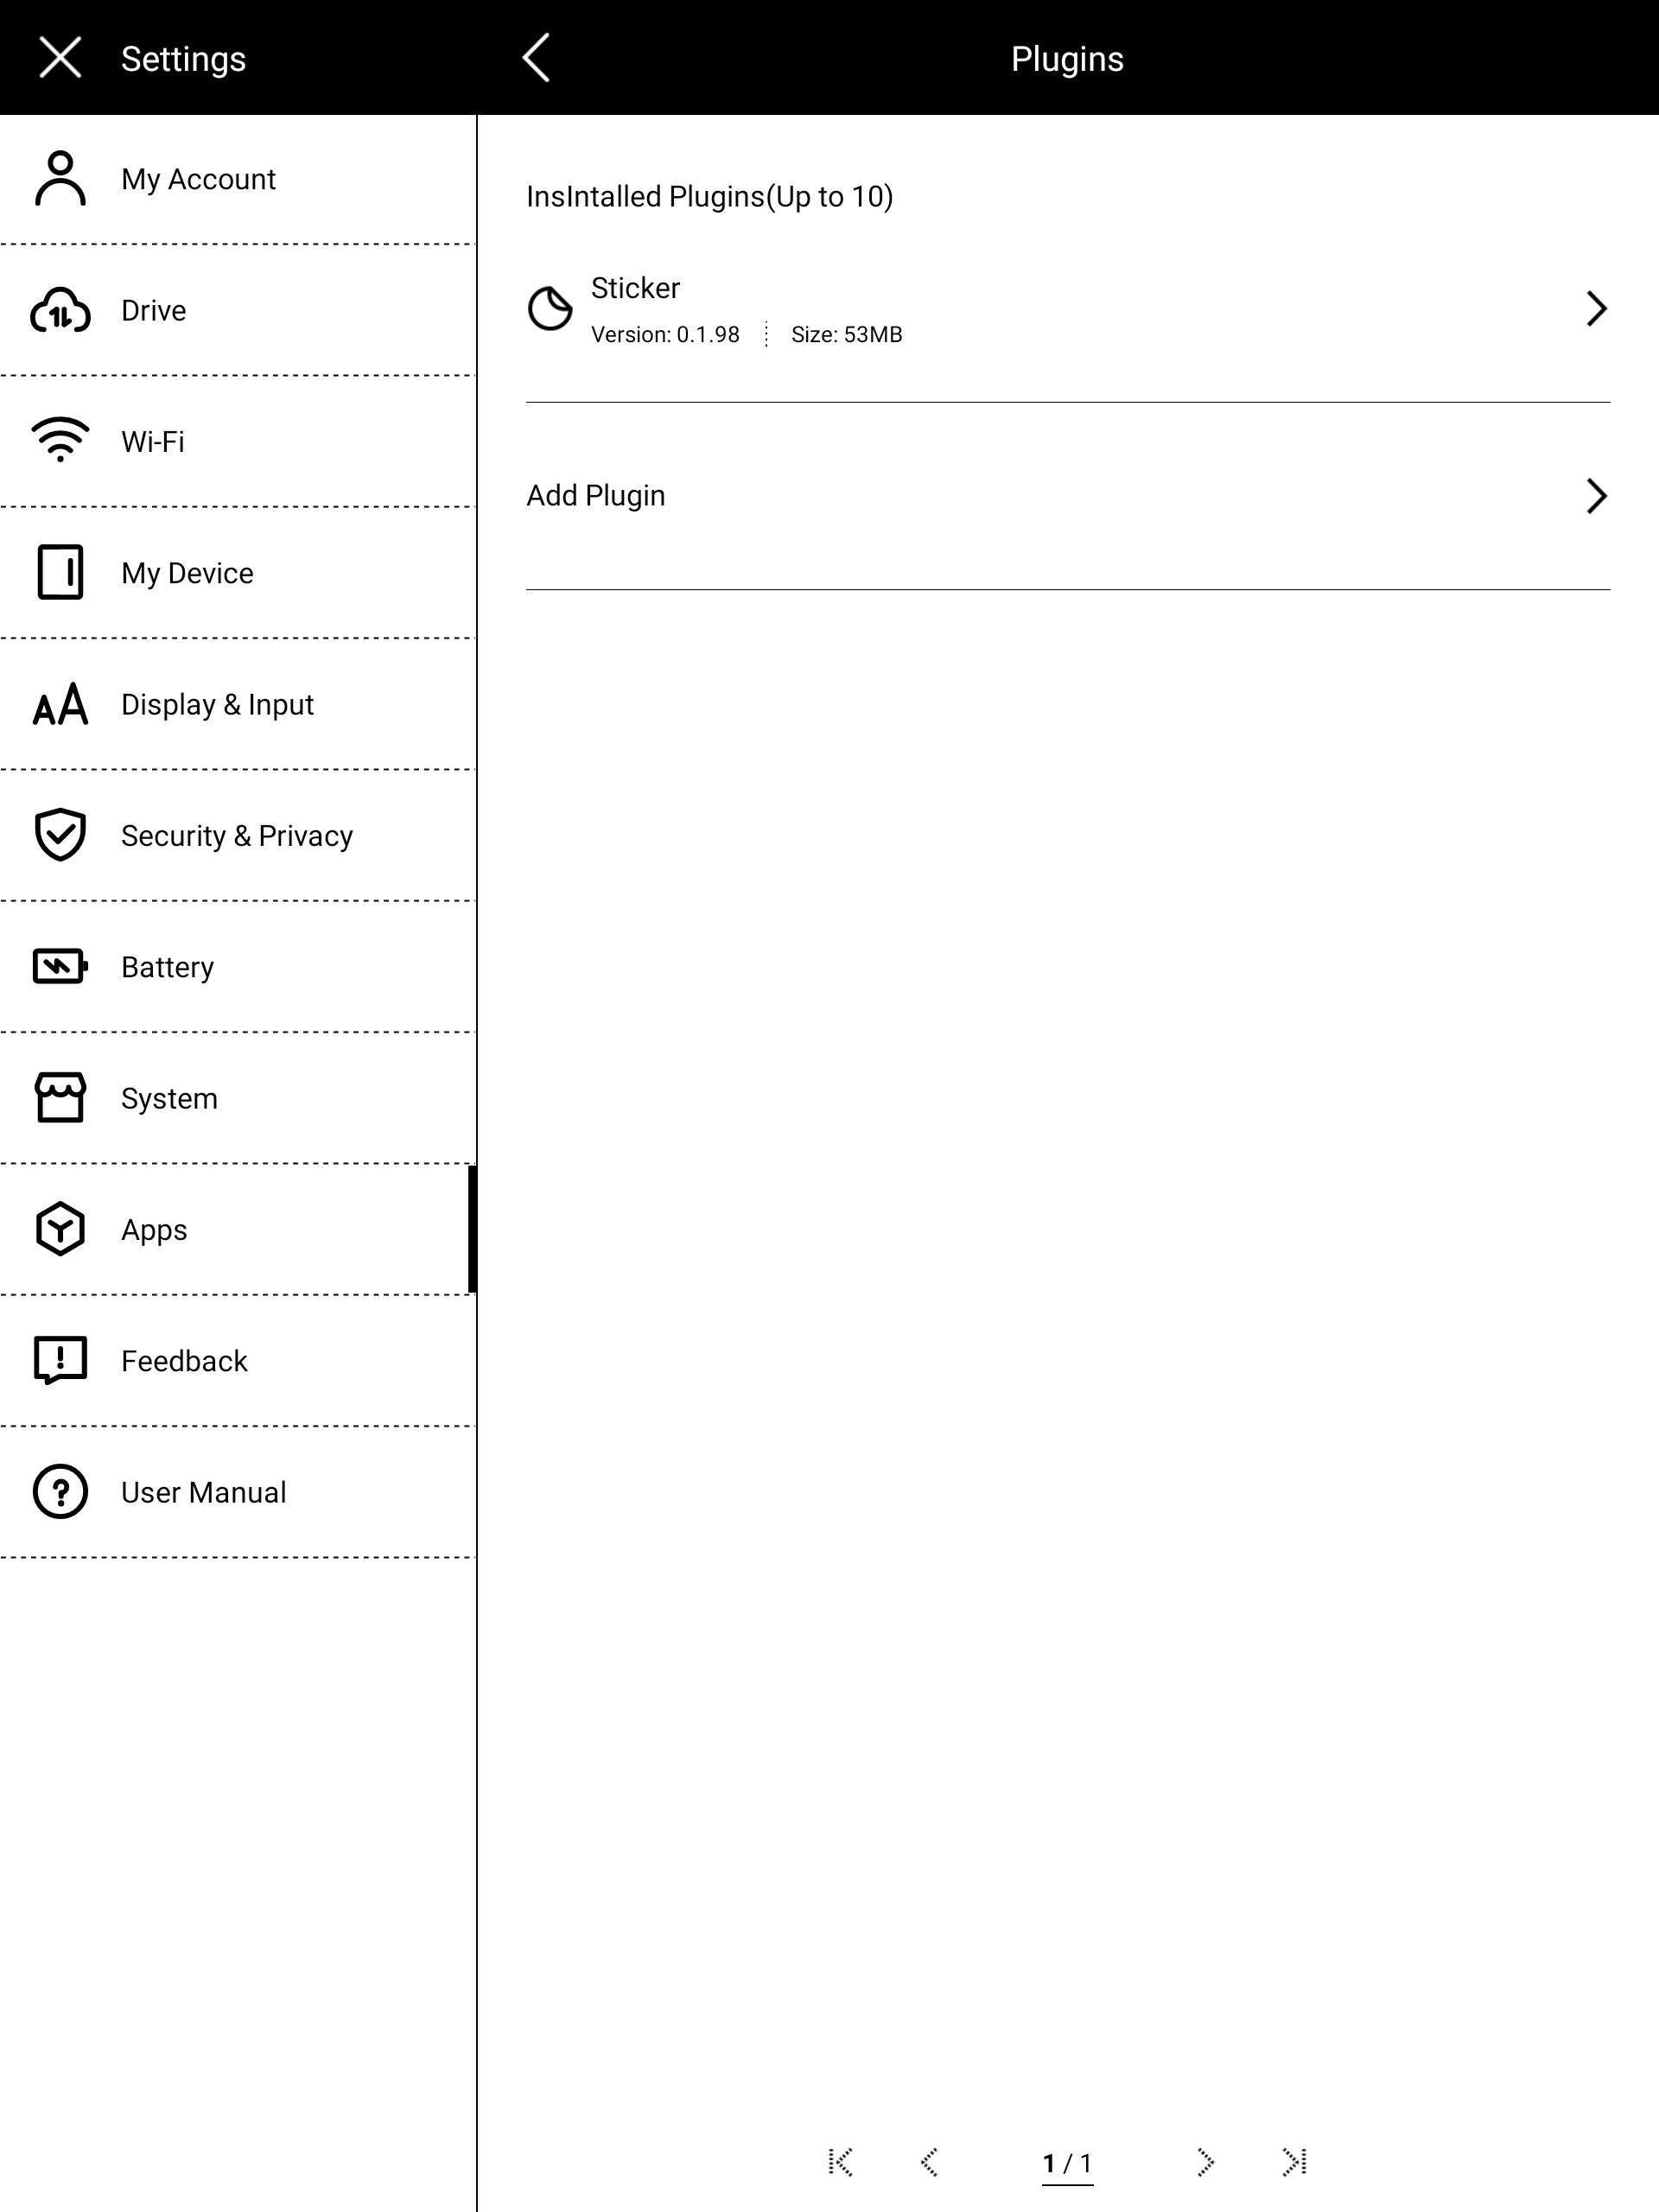 Tap "Add Plugin", select the package, and install:
 After installation, NOTE/DOC will show your registered buttons in the toolbar, lasso toolbar, or text-selection toolbar.