Install Dependencies
Required dependencies: Node.js, JDK, and Android Studio (with Android SDK). Steps below use Windows as an example.Node.js and JDK
- Node.js: use the current LTS version (and make sure it is >= 18)
- JDK: React Native Android builds require JDK 19 or higher (Oracle JDK or OpenJDK)
Yarn
Yarn is an alternative package manager developed by Facebook, and it can speed up downloads (for example, Node templates). Install it with:yarn instead of npm install, and yarn add <package> instead of npm install <package>).
Android Studio
If you haven’t set up Android Studio/SDK before, follow the steps below to complete the one-time installation and configuration.Install Android Studio
Download and installAndroid Studio. We recommend Android Studio Narwhal | 2025.1.2 or newer to avoid build failures caused by outdated versions.
In the Android Studio setup wizard, make sure to check all of the following:
- Android SDK
- Android SDK Platform
- Android Virtual Device
Install Android SDK
Android Studio installs the latest Android SDK by default. React Native currently requires the Android 15 (VanillaIceCream) SDK to build (note that the SDK version is not the same as the Android OS version; RN supports Android 6+ devices). You can select and install different SDK versions in Android Studio’s SDK Manager. You can find SDK Manager from the Android Studio welcome screen. Click “Configure” and then select “SDK Manager”.
- Android SDK Platform 35
- Intel x86 Atom_64 System Image (official emulator image; not required if you use a third-party emulator)
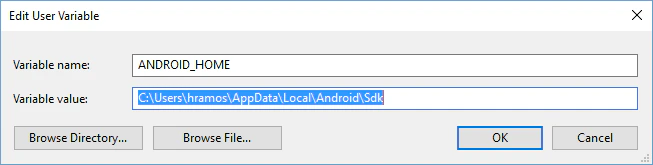
Configure ANDROID_HOME
React Native needs environment variables to locate your Android SDK for building. Open Control Panel -> System and Security -> System -> Advanced system settings -> Advanced -> Environment Variables -> New, create an environment variable named ANDROID_HOME (system or user variable), and point it to your Android SDK directory (your path may differ from the screenshot; verify it on your machine):